Live demo
Hover the two columns below to see a live demo where images are used as mouse cursors. I’ve used PNG images and a little CSS to achieve this.
👉 Related post: How to change the default mouse cursor in WordPress
1. Create your custom cursor image
Create your own cursors in Adobe Illustrator or find ready-made icons at Canva, Iconic and GraphicBurger. Upload the image to your WordPress Media Library.
Pro tip: If you take a close look at the default cursors, you can actually see a thin border line in a contrasting color. This is a good way to improve the visibility.
Which format and size should I use?
To ensure support from as many web browsers as possible, I recommend that you use:
- Transparent PNG
- Max 32 x 32 px image size (for Firefox compatibility)
- Avoid GIF and SVG
Make sure to keep down the file size to a couple of kilobytes to not slow down your page speed.
BONUS: Download a free mouse cursor pack!
- Enter your e-mail address below to subscribe to our newsletter.
- Download the zip file containing six fun custom mouse cursors
- Extract the zip file on your hard drive.
- Upload the PNG images to your WordPress media library and get creative!
2. Adding your custom cursor with CSS
Let’s spice things up by replacing the default mouse cursor with your custom image. You can apply it:
- Sitewide
- To specific pages or posts
- To entire sections
- To entire rows or specific columns
- To entire modules
Here we go!
✓ Adding a custom cursor to your entire website
- Go to your WordPress dashboard
- Click Appearance » Customizer
- Go to Additional CSS and paste the snippet below:
body { cursor: url('/my-folder/my-cursor.png'), auto; } - Replace the placeholder URL with the URL to your custom cursor image.
- Save and preview in frontend
Clear your browser and website cache if you don’t see any change.
Replacing the default hand icon for links
The snippet above will replace default arrow cursor sitewide, but it does not display when a visitor hovers a linked text or button with a link.
Use this snippet to replace the default hand icon for links:
body a {
cursor: url('/my-folder/link-cursor.png'), auto;
}
That’s it!
✓ Adding a custom cursor to a specific page or post
You could target the Page ID or Post ID in your CSS, for example like this:
.page-id-123 {
cursor: url('my-folder/my-cursor.png'), auto;
}
But if you are using the Divi theme, there is a more more convenient way:
- Enable the Divi Visual Builder on the page or post
- Expand the Visual Builder menu by clicking the purple icon in the bottom center
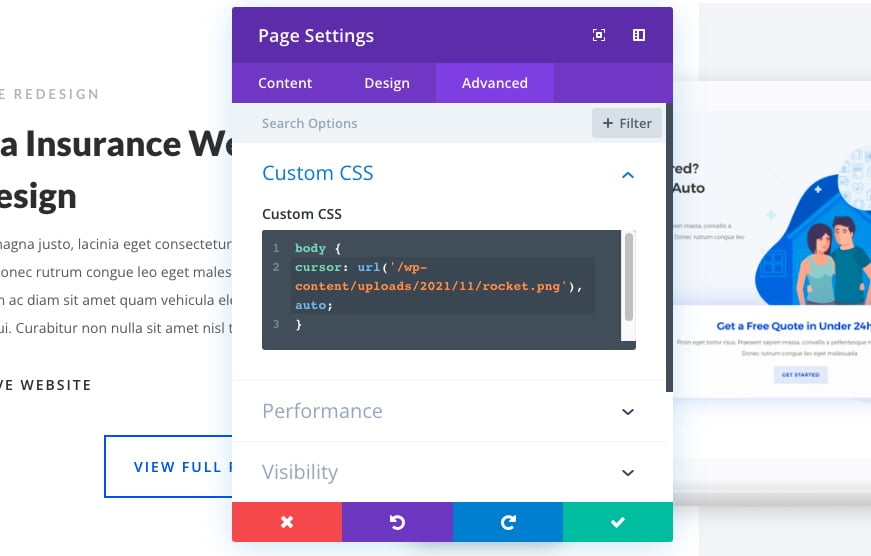
- Click the cogwheel to edit the Page Settings
- Click Advanced » Custom CSS and paste the snippet below
body { cursor: url('/my-folder/my-cursor.png'), auto; } - Replace the placeholder URL with the URL to your custom cursor image.
- Save and preview in frontend
Clear your browser and website cache if you don’t see any change.
✓ Adding a custom cursor to a specific element
You could target specific element on a page or post, for example a section, row, column or module by adding a CSS Class in the Divi Builder.
- Go to Divi » Theme Customizer from your WordPress dashboard
- Go to Additional CSS and paste the snippet below:
.dm-cursor { cursor: url('/my-folder/my-cursor.png'), auto; } - Replace the placeholder URL with the URL to your custom cursor image
- Save and exit the Theme Customizer
- Enable the Divi Visual Builder on the page or post that you want to edit
- Hover the specific element and click the cogwheel to edit the element settings
- Click the Advanced tab and expand CSS ID & Classes
- Add the CSS Class dm-cursor
- Save the changes and preview in frontend
Clear your browser and website cache if you don’t see any change.
That’s all for today!
I hope that you enjoyed this post. Subscribe to DiviMundo on YouTube and join our Facebook group for more crisp content on WordPress and web design.
👉 Related post: How to change the default mouse cursor in WordPress
👉 Free course: Create a website from scratch with Divi


0 Comments